
Easy HPL Façade Installation Guide for Spain
Introduction: Why HPL Façades Are Popular in Spain
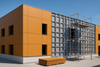
Spain’s diverse climate — from humid coastal regions to hot, dry interiors — demands façade materials that can handle both sun and moisture. High-Pressure Laminate (HPL) offers the perfect balance of durability, design choice, and ease of installation, making it a top choice for Spanish architects and contractors.
Tools & Materials You’ll Need
Before starting, ensure you have:
-
Measuring tape, chalk line, and spirit level
-
Drill with masonry and metal bits
-
Circular saw with carbide blade for HPL
-
Stainless steel screws or rivets (as per system)
-
Subframe (aluminium or galvanised steel)
-
Safety gear (gloves, goggles, harness for high-rise work)
Step 1: Preparing the Wall Surface
-
Ensure the wall is structurally sound and free of debris.
-
Repair cracks or loose render.
-
Mark reference lines for panel alignment using a laser or chalk line.
Step 2: Setting the Subframe
-
Use aluminium or galvanised steel profiles for corrosion resistance in Spain’s varied climates.
-
Anchor vertical profiles securely, checking alignment regularly.
-
Maintain required cavity depth for ventilation (usually 30–50 mm).
Step 3: Choosing the Right Fixing Method
In Spain, two common systems are used:
-
Visible Mechanical Fixing — Stainless steel screws or rivets, quick and cost-effective.
-
Concealed Fixing — Clips or undercut anchors for a clean, uninterrupted surface.
Step 4: Panel Cutting & Edge Preparation
-
Cut panels with a circular saw at moderate feed speed.
-
Smooth edges with fine sandpaper.
-
Seal any exposed edges for maximum weather resistance.
Step 5: Fixing Panels for Ventilated Façades
-
Start from the bottom row, working upward.
-
Keep fixings 20–60 mm from panel edges.
-
Use manufacturer-recommended spacing to handle thermal expansion.
Step 6: Joint Spacing & Expansion Gaps
-
Maintain 8–10 mm joints between panels.
-
Use joint profiles or open joints depending on design.
-
Ensure uniform gaps to allow for temperature changes.
Step 7: Finishing Touches & Safety Checks
-
Inspect all fixings for tightness.
-
Check panel alignment visually and with a level.
-
Remove protective films after installation to prevent adhesive residue.
Common Installation Mistakes in Spain
-
Skipping ventilation gaps in hot climates.
-
Using untreated steel subframes in coastal areas.
-
Over-tightening screws, causing panel stress cracks.
-
Ignoring thermal expansion calculations.
Maintenance After Installation
-
Clean panels twice a year with mild detergent.
-
Inspect fixings and subframe annually, especially in coastal zones.
-
Replace damaged panels promptly to maintain façade integrity.
FAQs
Do I need a ventilated system for HPL façades in Spain?
Yes — it improves thermal comfort and extends façade life.
What fixings are best for Spanish climates?
Stainless steel or aluminium fixings are ideal for corrosion resistance.
Can I install HPL panels directly onto walls?
Not recommended — a ventilated subframe is essential for performance.
How long does an HPL façade installation take?
Small projects can take 2–3 days; larger buildings may take weeks.
Is a building permit required for HPL cladding in Spain?
Often yes — check with your local municipal office.
Comment (0)